Share via:

-
Save
Let’s start building a website by setting up the home page, navigation, and publishing webpages. Divi prebuild template for WordPress is used as an example below. Before getting started, make sure you have a website template installed in WordPress. If you need help finding a website template, refer to our step-by-step guide on how to choose and install a website template in WordPress.
Also, refer to our resource on WordPress CMS, the overall best content management system that automatically comes installed with WPEngine managed web hosting service.
How to Start a Website by Setting Up a WordPress CMS Home Page
First, log in to your WordPress admin panel. Here is a refresher on how to access the WordPress admin panel in WPEngine.
How to Access WordPress CMS Admin Panel in WPEngine
- Log in to your WPEngine account.
- Select your website’s domain.
- Click on the triple-dot icon to the right of the screen.
- Click “WP Admin,” which opens up a new tab in the browser to access your WordPress admin panel.
How to Use Divi WordPress Website Builder to Create a Home Page in 6 Steps
Next, let’s walk through how to build a home page for a website in WordPress CMS. The home page is a crucial landing page on the website, as it is the storefront that represents your brand image.
Step 1: Create a New Page in WordPress CMS
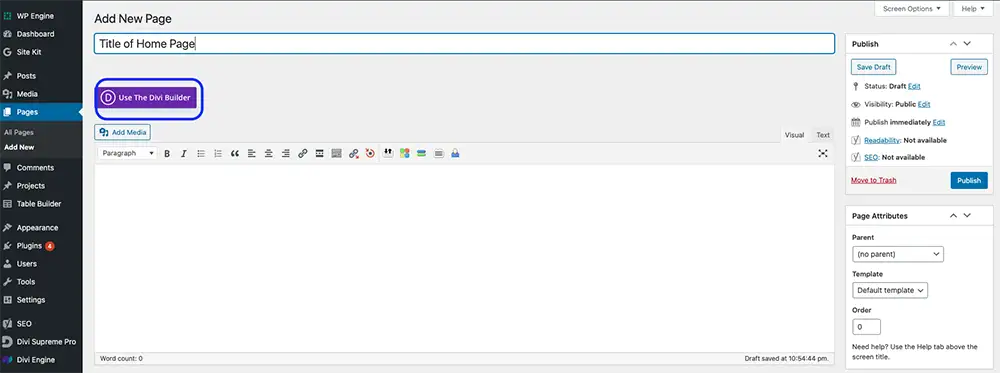
To build a home page, start by creating a blank page in WordPress.
- Go to “Pages” and click “Add New.”
- Give the page a title and a short description.
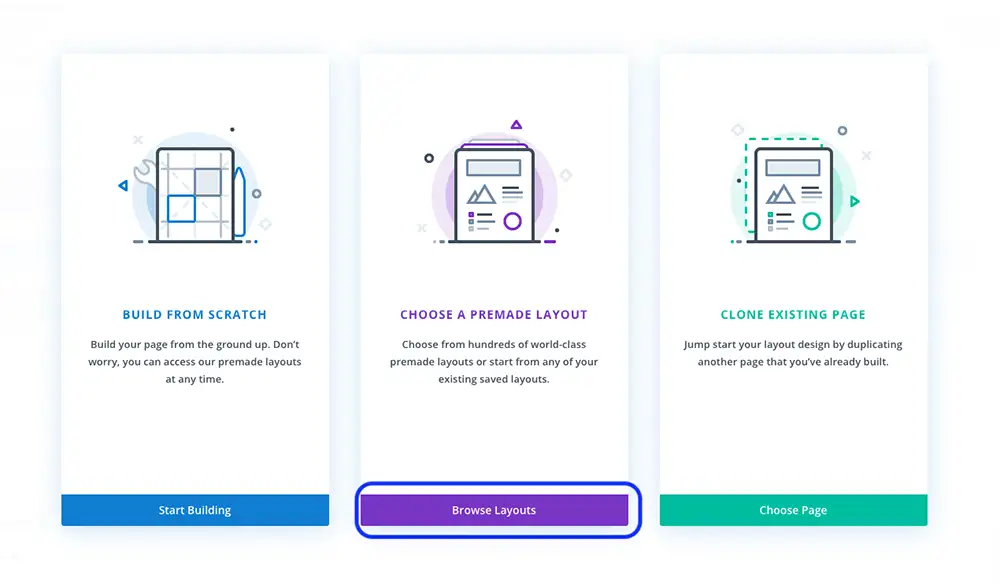
- Next, click the button “Use the Divi Builder.” You will have three options to choose from.
-
Save
Step 2: Choose a Home Page Layout
-
Save
Select “Choose a Premade Layout” and click the button “Browse Layouts.”
-
Save
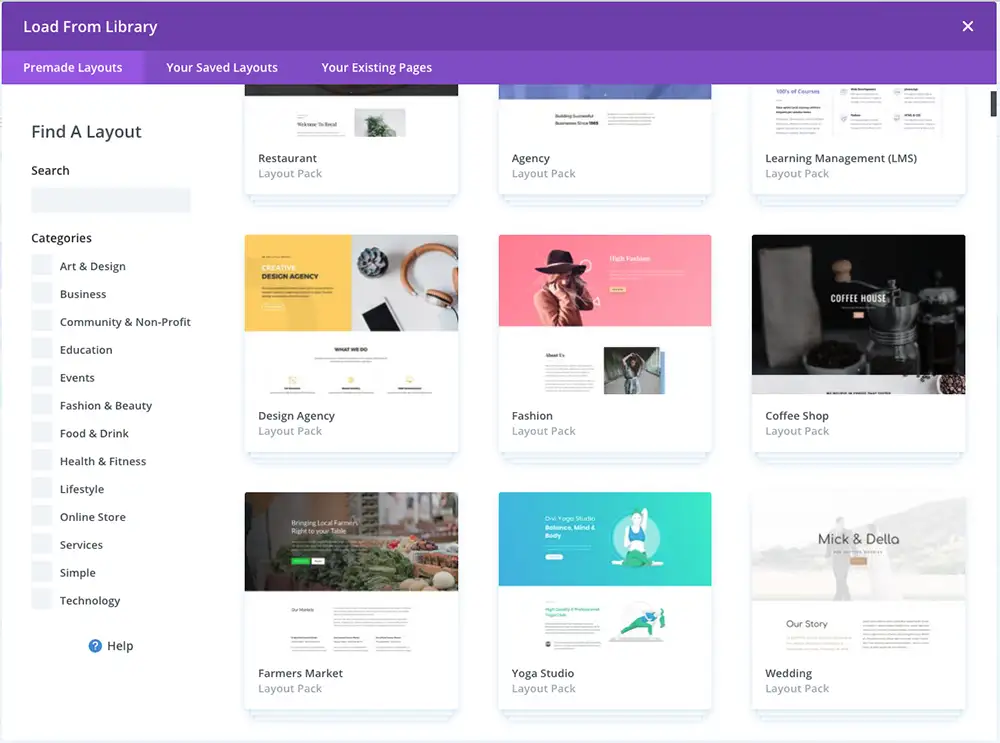
Choose your desired Divi theme from the “Premade Layouts” library.
-
Save
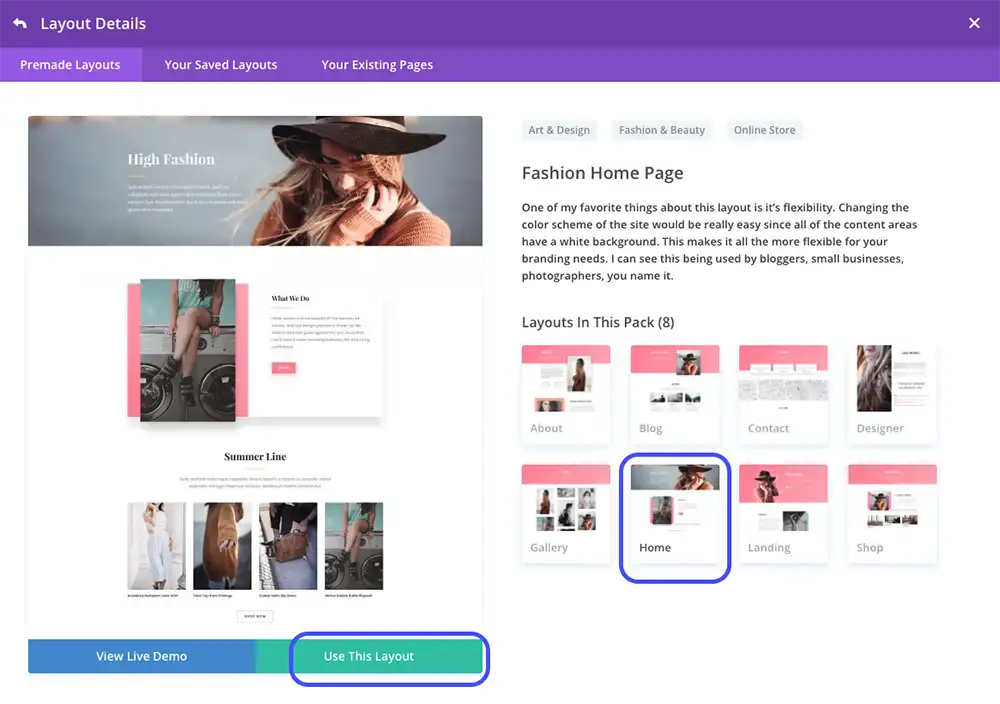
Select the page “Home” in the layout pack, then click “Use this Layout.” This step will set up the home page from your Divi template.
Step 3: Add Text and Visuals to the Home Page
-
Save
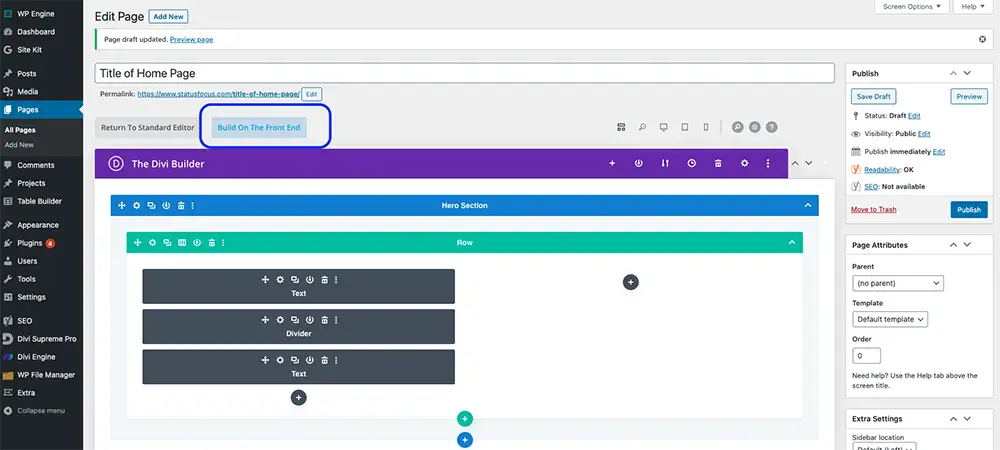
Click the button “Build on the Front End” to start editing the text and visuals on the page.

-
Save
You can easily make changes to the title, layout, modules, and images.
Step 4: Publish the Home Page

-
Save
Once satisfied with the home page design, click “Publish” on the bottom right of the screen to make the page live.
Step 5: Set the Published Webpage as the Home Page
-
Save
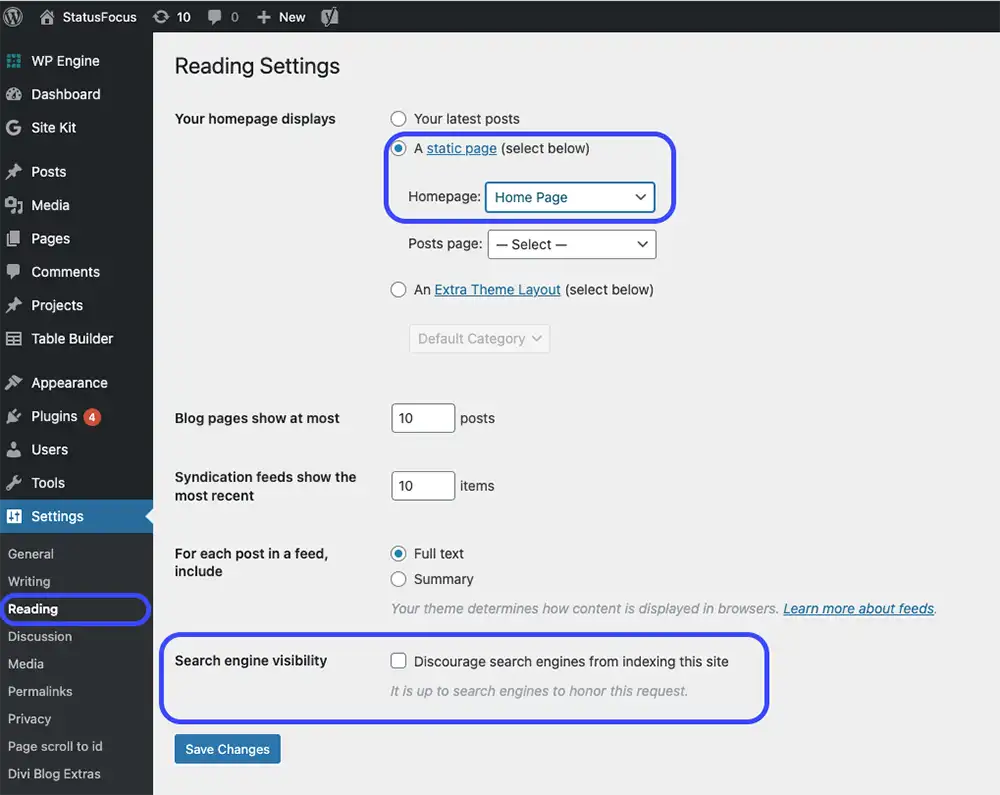
In the final step, let’s set the page you just published as the home page. Here’s how to do it:
- Navigate to “Settings” on the left side navigation.
- Go down to “Reading,” then select “Home Page” from the drop-down and choose the page you designed.
- Don’t forget to click “Save Changes.”
Congratulations! The home page is up and running.
You are almost done, be sure to complete one more critical step.
Step 6: Home Page Search Engine Visibility
Make sure your home page is searchable in Google. To do this, uncheck the box “Discourage search engines from indexing this site” from the option “Search Engine Visibility” so Google can index the website and make it visible through organic search.

-
Save
Best for WordPress templates.
5.0 Amppfy Rating
- A complete design framework that enables design and customization for every part of a website from the ground up.
- Complete control over everything web design related, down to the finest detail, to create the perfect website.
- Divi website builder is easy to start for beginners.
- Divi includes advanced design system that has the ability to scale large projects and design website workflows to the next level.
- 2,000+ pre-made designs.
- 200+ full website design packs.
- Complete design control over every web design element through the drag-and-drop visual builder.
- Responsive editing.
- Quick page creation.
- History, autosaves, and browser backups.
- Access hundreds of Divi extensions.
- 24/7 support.
Elegant Themes
Powerful no-code builder to create websites with ease.-
Divi Theme and Builder
-
Includes All Divi Features
-
Divi Quick Sites
-
Unlimited Website Usage
Official Guide on How to Use the Divi Builder on WordPress CMS
Now that you have gone through the basics of creating a home page on Divi through WordPress, check out the Divi Builder Plugin Documentation on how to make visual edits through the Divi Builder tool.
How to Start a Website by Creating a WordPress CMS Navigation
Creating a user-friendly navigation is another milestone step in building a website. Clearly mapped-out navigation guides visitors to the right landing pages and helps them quickly find what they are looking for.
-
Save
How to Create a WordPress CMS Navigation in 3 Steps
Step 1: Access WordPress CMS Admin Page
To start creating your website’s navigation in WordPress, log in and head over to the admin page of the WordPress instance.
Step 2: Find the WordPress Left-Hand Navigation Menu
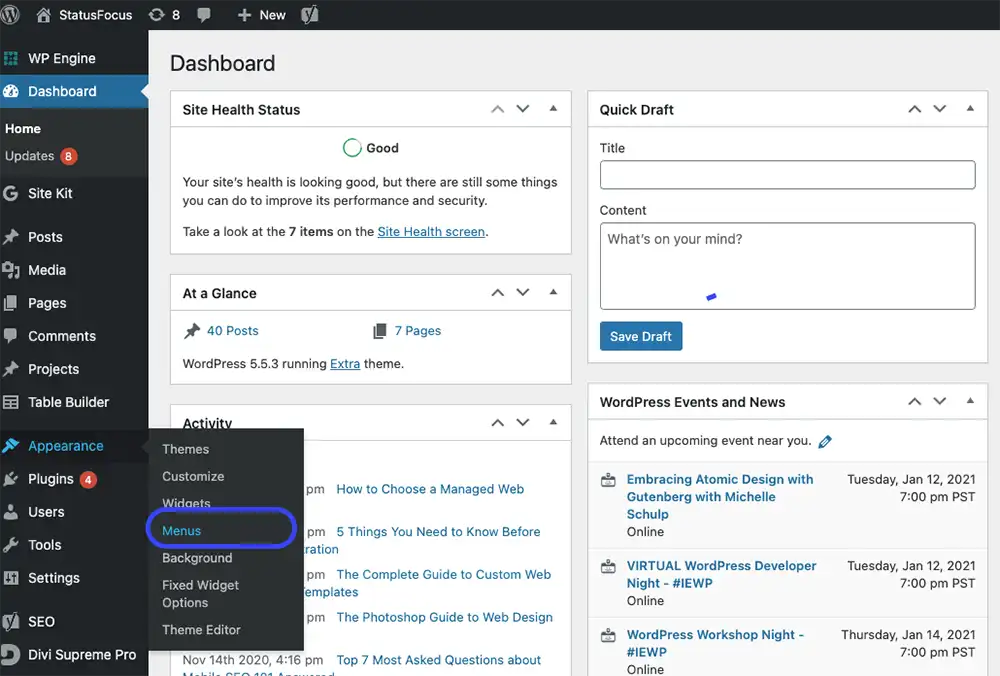
From the WordPress admin page, click “Appearance,” then go to “Menus” from the left-hand side of the screen.
-
Save
Step 3: Drag and Drop Content to Build Website Navigation
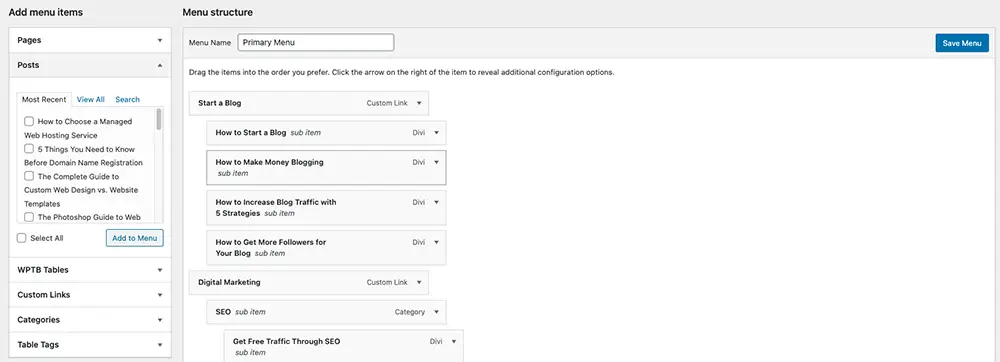
As you create pages and posts, you can drag and drop content to build out the navigation further. The left-aligned modules are the top-tier navigation, while the right-aligned modules contain the sub-navigation items.
Click “Save Menu” once you have completed the navigation.
How to Start a Website by Creating WordPress CMS Landing Pages
-
Save
Once the home page and navigation are complete, you can create content by publishing landing pages such as product and service webpages or blog posts. Content boosts a website’s search visibility and is the foundation of your digital market strategy.
Let’s use a blog post as an example to demonstrate how to publish a WordPress webpage with content.
How to Start a Blog with WordPress CMS in 3 Steps
Step 1: Create a New Post
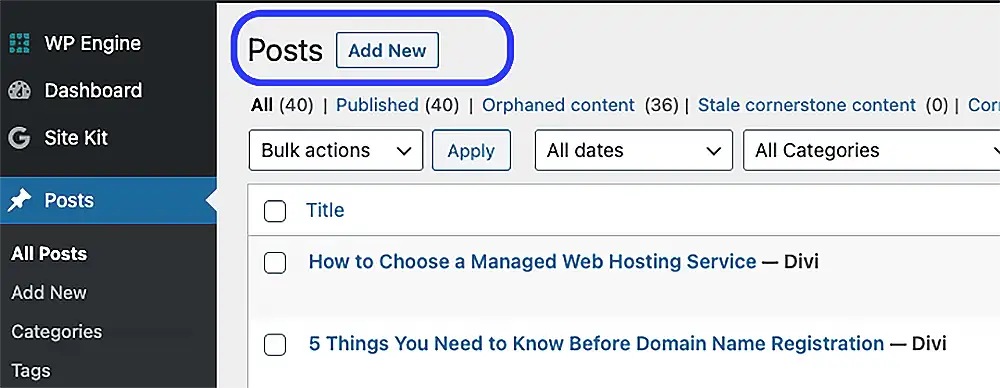
To start publishing a blog post page, select the left-hand menu item “Posts,” then click “Add New.”
-
Save
Step 2: Add a Title and Content
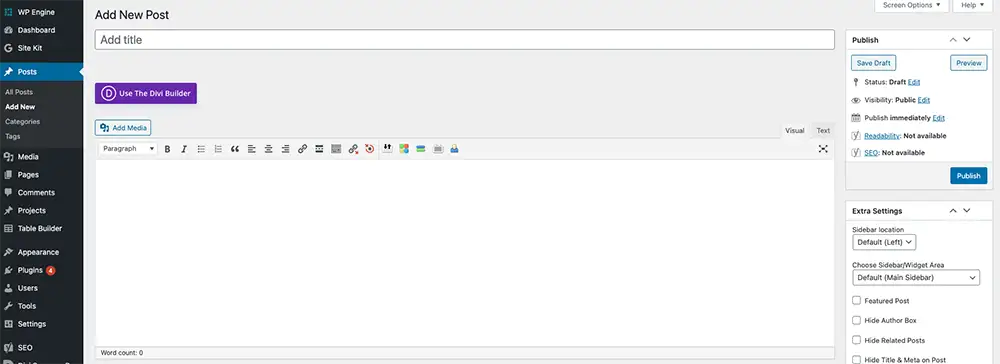
- Give the blog post a title, then add text in the content box.
- Insert a few compelling images to support and boost the content quality, authority, and appeal.
Step 3: Tag the Post and Publish Content
- Once the blog post is complete, tag it to a category to organize and assign a hierarchy to the content.
- When the blog post is done, hit the “Publish” button to make the post live.
You have successfully completed your website’s home page, navigation, and landing page. Way to go!
Continue the Learning Journey with Amppfy
Amppfy’s digital marketing resource library is beginner-friendly, and zero technical or marketing experience is required to get started. Learn how to create a practical, actionable, and programmatic digital marketing playbook for any business website, e-commerce store, or content platform. Leverage effective SEO, SEM, and social media strategies to boost brand authority, increase online visibility, and generate quality demand.
Follow us on LinkedIn, Facebook, Instagram, and YouTube to stay updated on the latest marketing news, strategies, and free content.
Get Started with Free Generative AI Marketing Tools
- 100% Free
- No Account Required
- Available 24/7
Share via:


